3 · The interface
The whole program is one screen: a header across the top, the active reading mode filling the middle, and a status line along the bottom. There are no hidden panels; every control is visible at full contrast at all times, by design. The few dialogues the program opens (section 3.3) ask one question and close on its answer.
3.1 The header

The header is one row on a wide screen and wraps onto a second row, whole groups at a time, when the window is narrower than its controls. The still shows the local app, so it carries callouts 1 to 9; Agent (10) and the desktop download menu (11) join them on the website and, for Agent, in the desktop app. From left to right:
CBCTScope, with what it is under the name: CBCT and radiograph viewer. Beside it, the version button (for example
v2.1.1). Clicking it opens a short panel naming the software, its version, its author (his name is a link to his site), its research-use status, a link to the About page (About CBCTScope and how to cite it) and a link to the source code repository; in the desktop app it also links Check for updates, which opens the website's update page in your browser (section 2.6). Escape or a click outside closes it. Quote the version from here when reporting a problem or citing the software.Research use only. Not a medical device. (the desktop app and the local app say Not for diagnosis.) A permanent badge, not a dismissible banner. It states what the program is; see "Intended use" on the manual's front page.
Mode tabs: MPR, Grid, Pano, TMJ, Reslice, Ceph, Region, Stitch, drawn as one group; the selected mode is the solid blue tab. One click switches the reading mode; the loaded volume is untouched. Chapter 8 introduces the modes. A 2D radiograph replaces the tabs with a single 2D radiograph label, since the volume modes have nothing to act on.
Volume list: a dropdown listing every image the viewer currently serves, grouped as Stitched (session stitches from the Stitch mode), Opened (your export, under its folder name), and Built in (the phantom). Each entry shows its field of view, matrix, and acquisition details where present. The built-in phantom is the Geometric test phantom: simple geometric shapes with an arch of tooth-like cylinders, for trying the controls; it is not anatomy. The previous and next buttons on either side of the list, or the
NandPkeys, cycle through it.Open: the source menu for opening and closing your own exports (chapter 4). It always reads Open; the opened folder's name is in the volume list.
Export: the volume export menu (chapter 7). Shown for volumes, not for 2D radiographs, whose slice stacks and surface meshes have no meaning.
Snapshot: saves what the current mode shows as a PNG (chapter 7). This one button serves every mode, including 2D radiographs.
Keys: the complete reference for the current mode, in words: its keys, its pane buttons (MPR), and under Mouse every mouse gesture of the mode, pane by pane (chapter 12).
Help: the reading guide for the current mode (chapter 8), this manual, About CBCTScope, Cite this software, Legal notice, and the Source code repository. The viewer serves the manual itself, so it needs no network. In the local app and the desktop app it opens in a drawer at the right edge that narrows the viewer and covers no control, with the manual's contents and search; Close manual gives the width back. On the website it opens in a new browser tab. About CBCTScope (what the software is, who made it, how to cite it, the licence and a privacy summary) and Legal notice (the legal notice, privacy, research use, licence and warranty) open the same way: in the drawer, with Close page, or in a new tab on the website. Cite this software opens a small dialogue with a reference line and a BibTeX entry, both taken from the repository's citation file, each with a copy button that copies it to the clipboard when clicked; Close or Escape closes it. The links inside the manual to other pages of the project open only when you click them; the viewer itself never contacts the network (chapter 10).
Agent (the website and the desktop app): opens the strip of the opt-in navigation agent under the viewer (section 9.6). It reads Agent on while the agent is on and carries no status otherwise; the strip names the provider and holds Switch off.
Download the desktop app (the website in a plain browser only; it reads Desktop app on a narrower window): a menu of direct downloads from the latest release: Mac with Apple silicon, Mac with Intel, Windows, a line on telling the two Macs apart, and All downloads and release notes (sections 2.5 and 2.6). Your own system's entries come first.
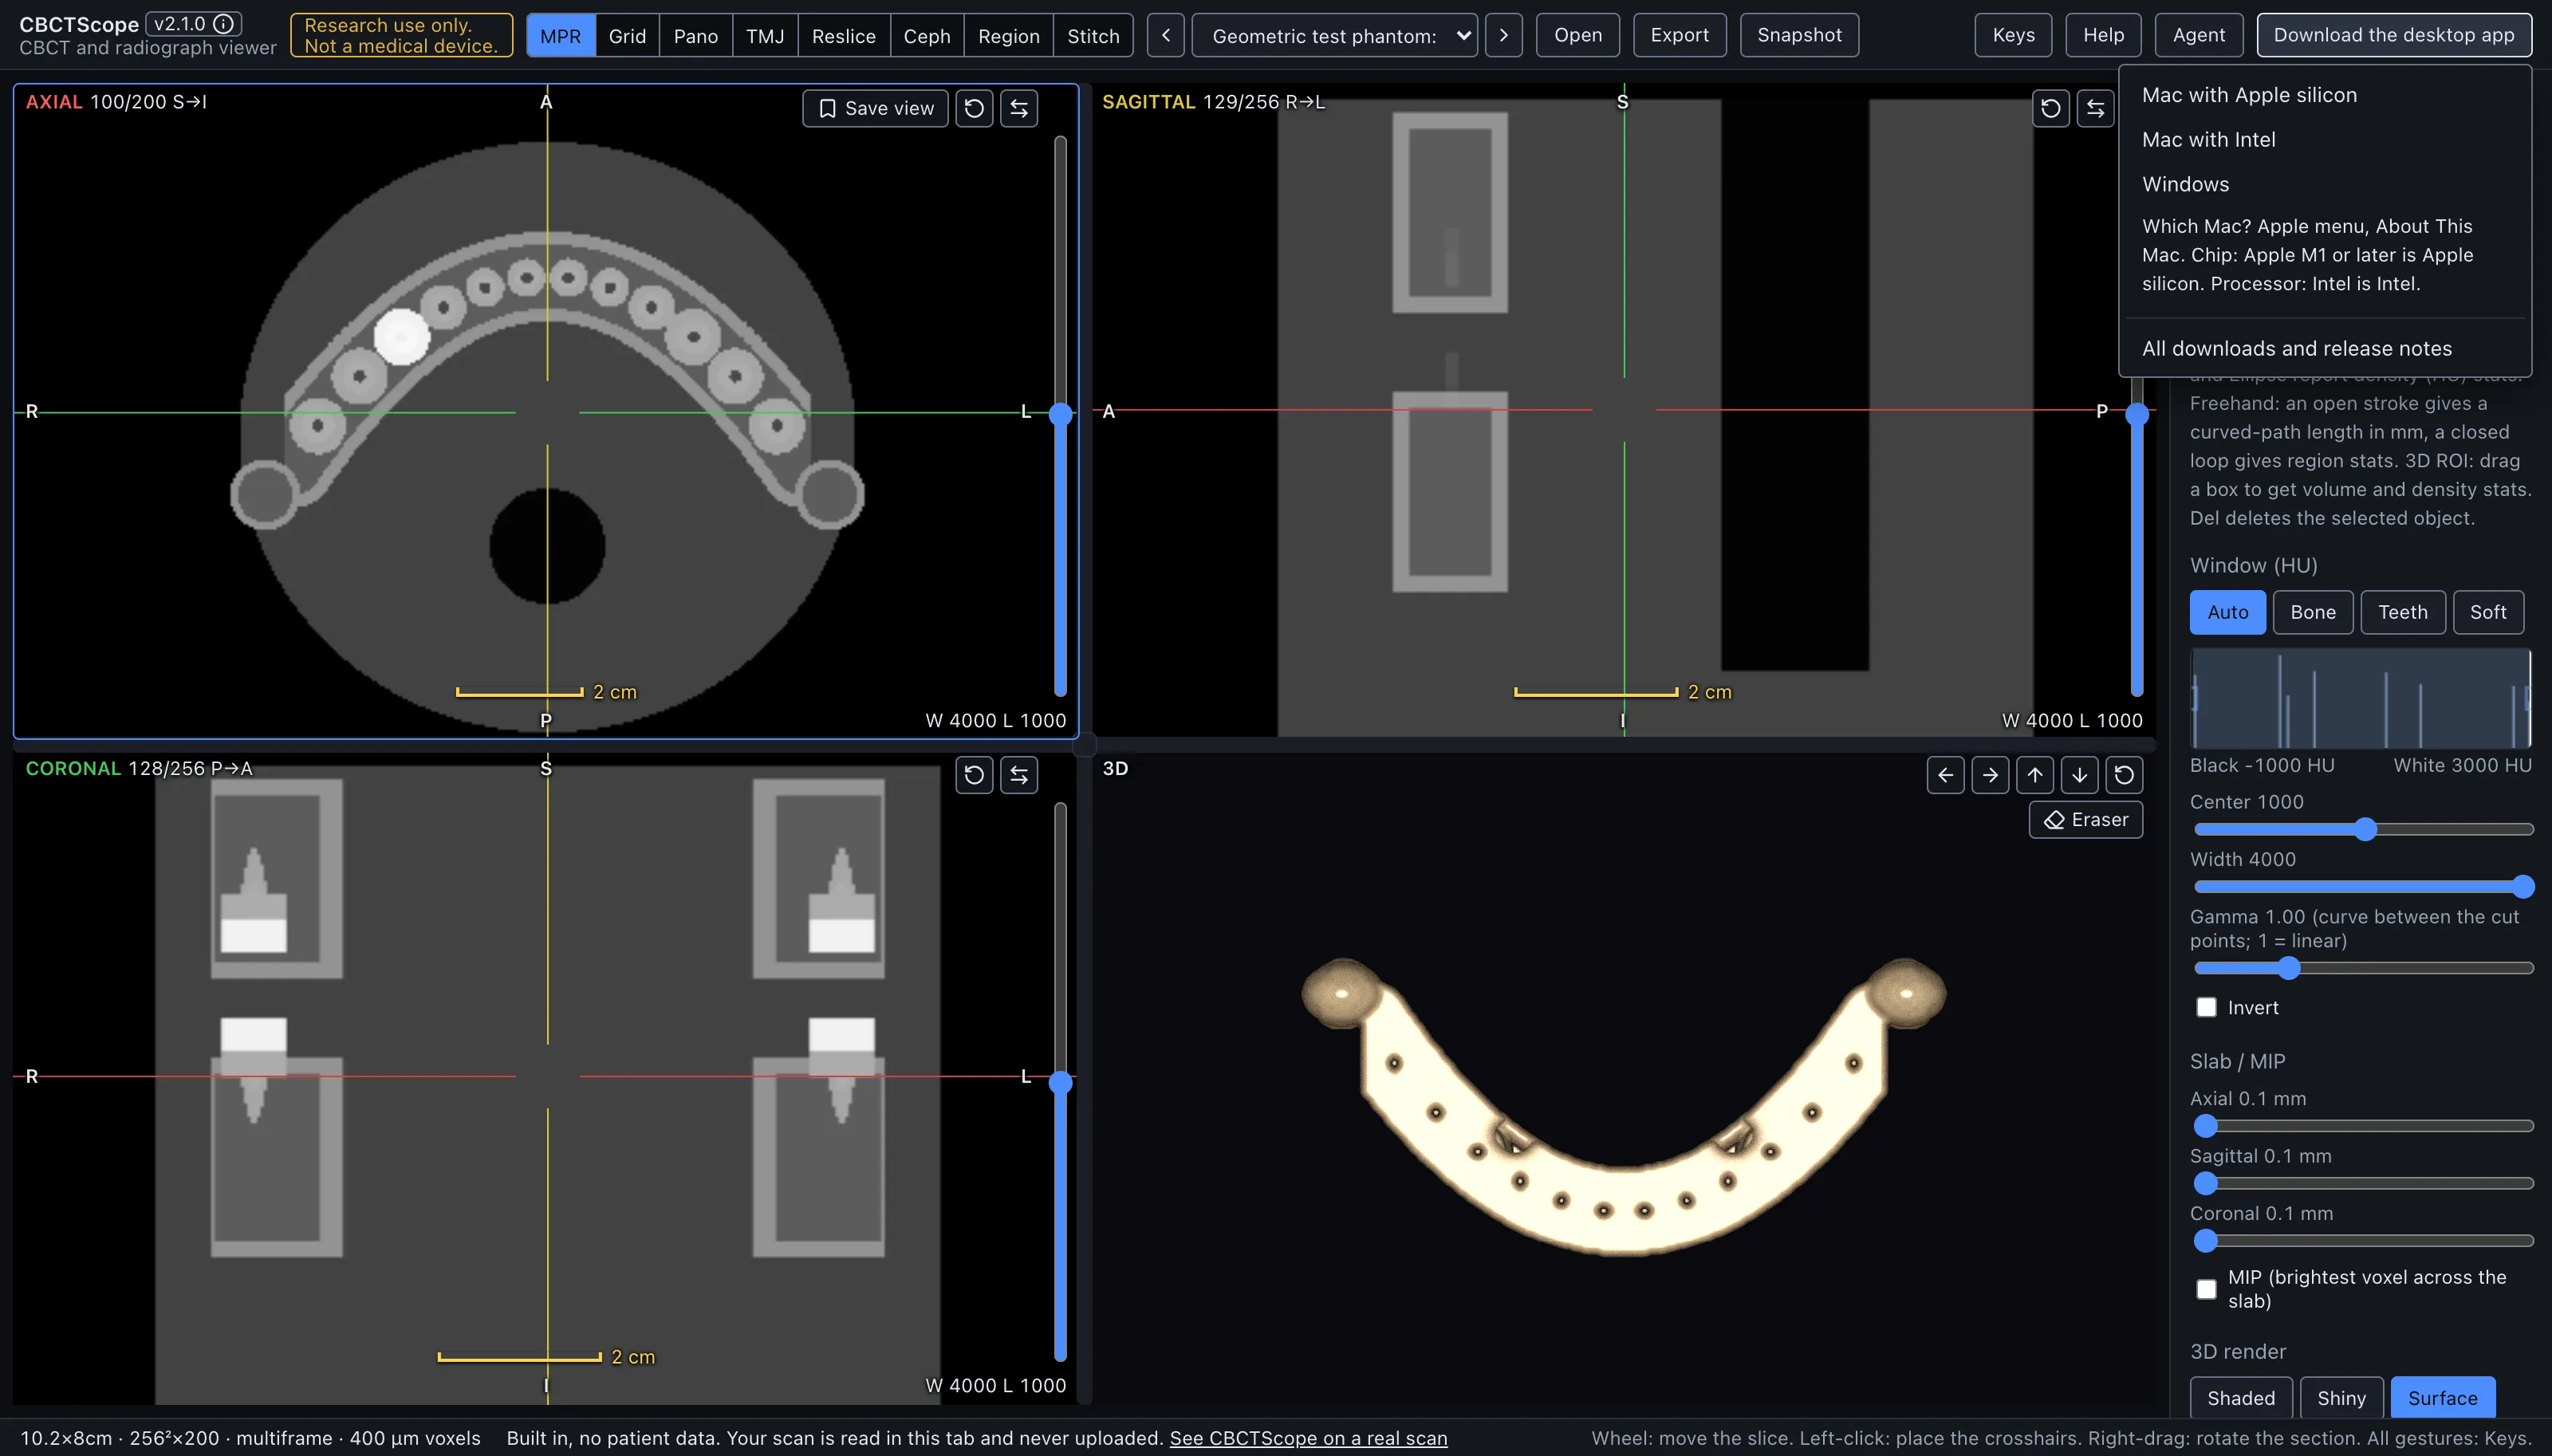
Every menu and popover closes with Escape or a click anywhere outside it, the image included; the arrow keys move through a menu's entries. Keyboard focus shows as a blue ring around the control.
3.2 The status line
The line along the bottom of the window holds what describes the image and what teaches the mouse, so the header keeps to controls:
- Image facts: the current image's name (the phantom is named once, in the volume list), field of view in cm, matrix, source kind (slices, multiframe, or radiograph), and voxel or pixel size in µm.
- First-run line: while the phantom is on screen and nothing of yours is open, it says "Built in, no patient data. Your scan is read in this tab and never uploaded." (the desktop app and the local app say "on this computer") and links See CBCTScope on a real scan to stills of a real, consented CBCT (bone only) on the project page. It leaves by itself once you open an export.
- Gesture legend (right): at most three of the current mode's mouse gestures, each as "gesture: effect", then "All gestures: Keys." In MPR the left button follows the active tool. The legend is never cut short: where the line cannot hold it, it wraps onto a second line. The Keys card lists every gesture of the mode.
Below 768 px wide (a phone, or a very narrow window) a notice above the viewer says that CBCTScope reads scans in a desktop browser and that here you can look at the built-in phantom. A screen reader reads it before the header.
3.3 The mode area
Each reading mode fills the area between the header and the status line with its own panes and its own control rail; the per-mode guides (chapters 8.1 to 8.8) document them control by control, and the Keys card lists each mode's mouse gestures. Conventions that hold across modes:
- One Snapshot button lives in the header next to Export, in the same place no matter which mode is open. It saves a PNG of what the current mode shows, exactly as displayed, to your Downloads folder; each mode supplies its own composition behind that one button.
- Selected means solid blue. A selected mode tab, tool, window preset or 3D style is a solid blue chip with dark text; nothing else is drawn in that blue.
- Slice numbers count one way, everywhere. Every slice ordinal on screen or in
a saved PNG is the pane's own count, 1-based, with its direction printed beside
the number:
AXIAL 622/801 S→Imeans slice 622 of 801 counting from the superior (top) end; coronal counts P→A (back to front), sagittal R→L (patient right to left). The axial scouts in Pano, TMJ, Reslice and Region use the same count as the MPR axial pane, so a number read in one mode means the same slice in another. The slice-stack export is the one deliberate exception: its filenames carry the voxel index (chapter 7), and itsmeta.jsonstates the mapping. - Double-clicking any slider resets it (navigation sliders to the volume middle, parameters to their defaults).
- The reading place carries between modes. The axial level and the MPR crosshair are shared: MPR at axial slice 120 opens Pano, TMJ, Reslice and Region on slice 120, and MPR comes back at 120 with the crosshair where it was, at the same x and y. The place belongs to the open volume (the paired series of one acquisition count as one volume) and lives in this tab or window only; another volume starts at its own default, and the place is not kept across a relaunch.
- Disabled controls stay fully readable and their tooltip says why they
are unavailable; nothing dims, hides, or unmounts. The one dimming in the
program is the backdrop behind an open dialogue, whose controls are the only
ones that answer until it closes; Tab stays inside the dialogue, and the
viewer's keys (
N,Pand the rest) wait until it closes. - Pane dividers between a mode's panes drag to resize and double-click back to the default split.
- Double-click is otherwise a per-mode verb: in MPR it maximizes a pane and restores the 2 by 2 layout on the second double-click; in Pano and Reslice it finishes the arch or path being drawn; on a slider or crop handle it resets that control.
3.4 Window controls
The density window (chapter 5) is set once and applies across modes: presets, a histogram with draggable black and white cut lines, Center and Width sliders, a Gamma slider, and an Invert checkbox. Until a volume has loaded, the sliders show no number.
3.5 The objects panel and saved views
In MPR, a strip under the four panes lists every annotation and measurement
on the current volume (chapter 6) together with saved views; it appears
once there is something to list and never covers an image. Press V, or the
Save view button in the axial pane's top-right corner, to save the
current view: all four pane cameras plus the display state
(window, render settings). One click on a saved view restores it exactly. A
view saved by an AI agent over MCP (chapter 9) carries an agent badge, so
your bookmarks and the agent's never mix.
Annotations and saved views persist per volume across sessions; they are
stored as small text sidecars on this machine, never inside the scan
(section 10.2).
3.6 Global keys
N / P next and previous volume · 1 to 9 and 0 select the tool ·
R reset orientation · C toggle plane lines · O toggle overlays ·
V save the current view · Del delete the selected annotation. The Keys
card lists the current mode's keys and mouse gestures; chapter 12 is the full
reference.
3.7 The image panes
Every slice pane, in every mode, keeps the same corners, in 12 px text on a dark halo so it reads on bright bone as on air, with numbers in fixed-width figures so they do not jitter while they change:
- Top left: the plane, in its colour (axial red, sagittal yellow, coronal
green), and the slice as n/N with the direction of the count, for example
AXIAL 100/200 S→I. No mouse hints sit in a pane; they are in the Keys card and the status line. - Bottom right: the window the pane shows, width then level, for example
W 4000 L 1000. It follows the presets, the sliders and a window drag. In Pano the pano's own readout follows Auto adjust. - Edge midpoints (MPR): the patient-orientation letters, computed from the live camera.
- Bottom centre (MPR): the scale bar, a yellow bar of a round length (1,
2 or 5 mm, 1, 2 or 5 cm and so on) with its length beside it.
Ohides it with the other overlays. - Bottom left (MPR): the HU under the cursor.
- Top right: the pane's buttons. On a pane too narrow for them (a phone width) the buttons wrap onto further rows inside the pane, under the label, and never leave the window.
- Bottom left (3D pane, once you have cut into the render): Clear N cuts, a text button with a scissors icon that removes every cut at once.
In Pano, TMJ and Reslice the captions of the pano and of each section sit in a strip above the image, never over it. Measurement labels stay inside the image, on the same dark halo.
The pane that takes the mouse wheel carries a thin blue frame: the pane the pointer is in, or the last one it was in. Nothing else about a pane changes with the pointer.
The pane buttons show an icon only, 14 px, each with its standard meaning; the keys card lists them with their names, and a screen reader reads the name:
| Icon | Button | Where | What it does |
|---|---|---|---|
| Counter-clockwise arrow | Reset view | every MPR pane | Re-fit that pane's zoom and pan; orientation and window stay. On the 3D pane it re-homes the camera. |
| Left-right arrow | Flip | MPR slice panes | Mirror the pane's viewing direction; the letters follow. |
| Left arrow | Orbit left | 3D pane | Turn the render left; hold to keep turning. |
| Right arrow | Orbit right | 3D pane | Turn the render right; hold to keep turning. |
| Up arrow | Orbit up | 3D pane | Tip the render up; hold to keep turning. |
| Down arrow | Orbit down | 3D pane | Tip the render down; hold to keep turning. |
| Curved back arrow | Undo erase | 3D pane, eraser on | Undo the last eraser stroke. |
| Curved forward arrow | Redo erase | 3D pane, eraser on | Redo the stroke just undone. |
Four pane buttons keep their words beside the icon: Save view (axial
pane, V), Eraser and Revert (3D pane), and Clear N cuts (3D
pane, bottom left, once there is a cut). Grid's Reset view sits in
its toolbar.
3.8 The desktop app's menu bar
The desktop app (section 2.6) adds the system's menu bar. Every item reaches something the screen already offers; none adds a function of its own.
- CBCTScope (macOS only): About CBCTScope, then Check for Updates…, then the system's Services, Hide, Hide Others, Show All and Quit.
- File: Open DICOMDIR or DICOM Folder… (
Cmd-Oon macOS,Ctrl-Oon Windows) and Open a Single DICOM File… (Cmd-Shift-O,Ctrl-Shift-O) open the same pickers as the two entries of the header's Open menu (chapter 4); like that menu, they do nothing while a scan is being read. Save Snapshot… (Cmd-S,Ctrl-S) presses the header's Snapshot button, and the save panel follows (section 7.1); with no image on screen it does nothing. Then Close Window on macOS, Exit on Windows. - Edit, View (Actual Size, Zoom In, Zoom Out, full screen) and Window: the system's own.
- Help: CBCTScope Help opens this manual in the drawer, Keyboard and Mouse Reference opens it at chapter 12, Cite CBCTScope opens the same dialogue as Cite this software in the header's Help menu, Legal Notice opens the legal notice in the drawer, and CBCTScope Website opens cbctscope.com in your browser. On Windows, Check for Updates… and About CBCTScope follow at the end.
Check for Updates… opens the website's update page in your browser; the app itself never checks for updates and contacts nothing (section 2.6).