MPR
At a glance
- What the view shows: what is here, in three dimensions: localize it, follow it across planes, measure it in true millimetres, present it. The default view; when in doubt, start here.
- Start: open the scan, press
Rfor orthogonal planes, pick a window preset (Bone, Teeth, Soft, or Auto), click a structure to spot the crosshairs.- Three gestures: the wheel scrolls the hovered pane; the left button runs the tool (with Crosshairs, a left-click places the crosshairs and a left-drag pans); right-drag rotates the section. On the 3D pane, left-drag orbits and right-drag cuts in. The Keys card lists every gesture of the mode.
- Leave it for: a slice-by-slice survey (Grid), the dental arch (Pano), the condyles (TMJ), any other cut (Reslice), a film-like projection (Ceph), a density region (Region), two volumes of one subject (Stitch).
What this mode is for
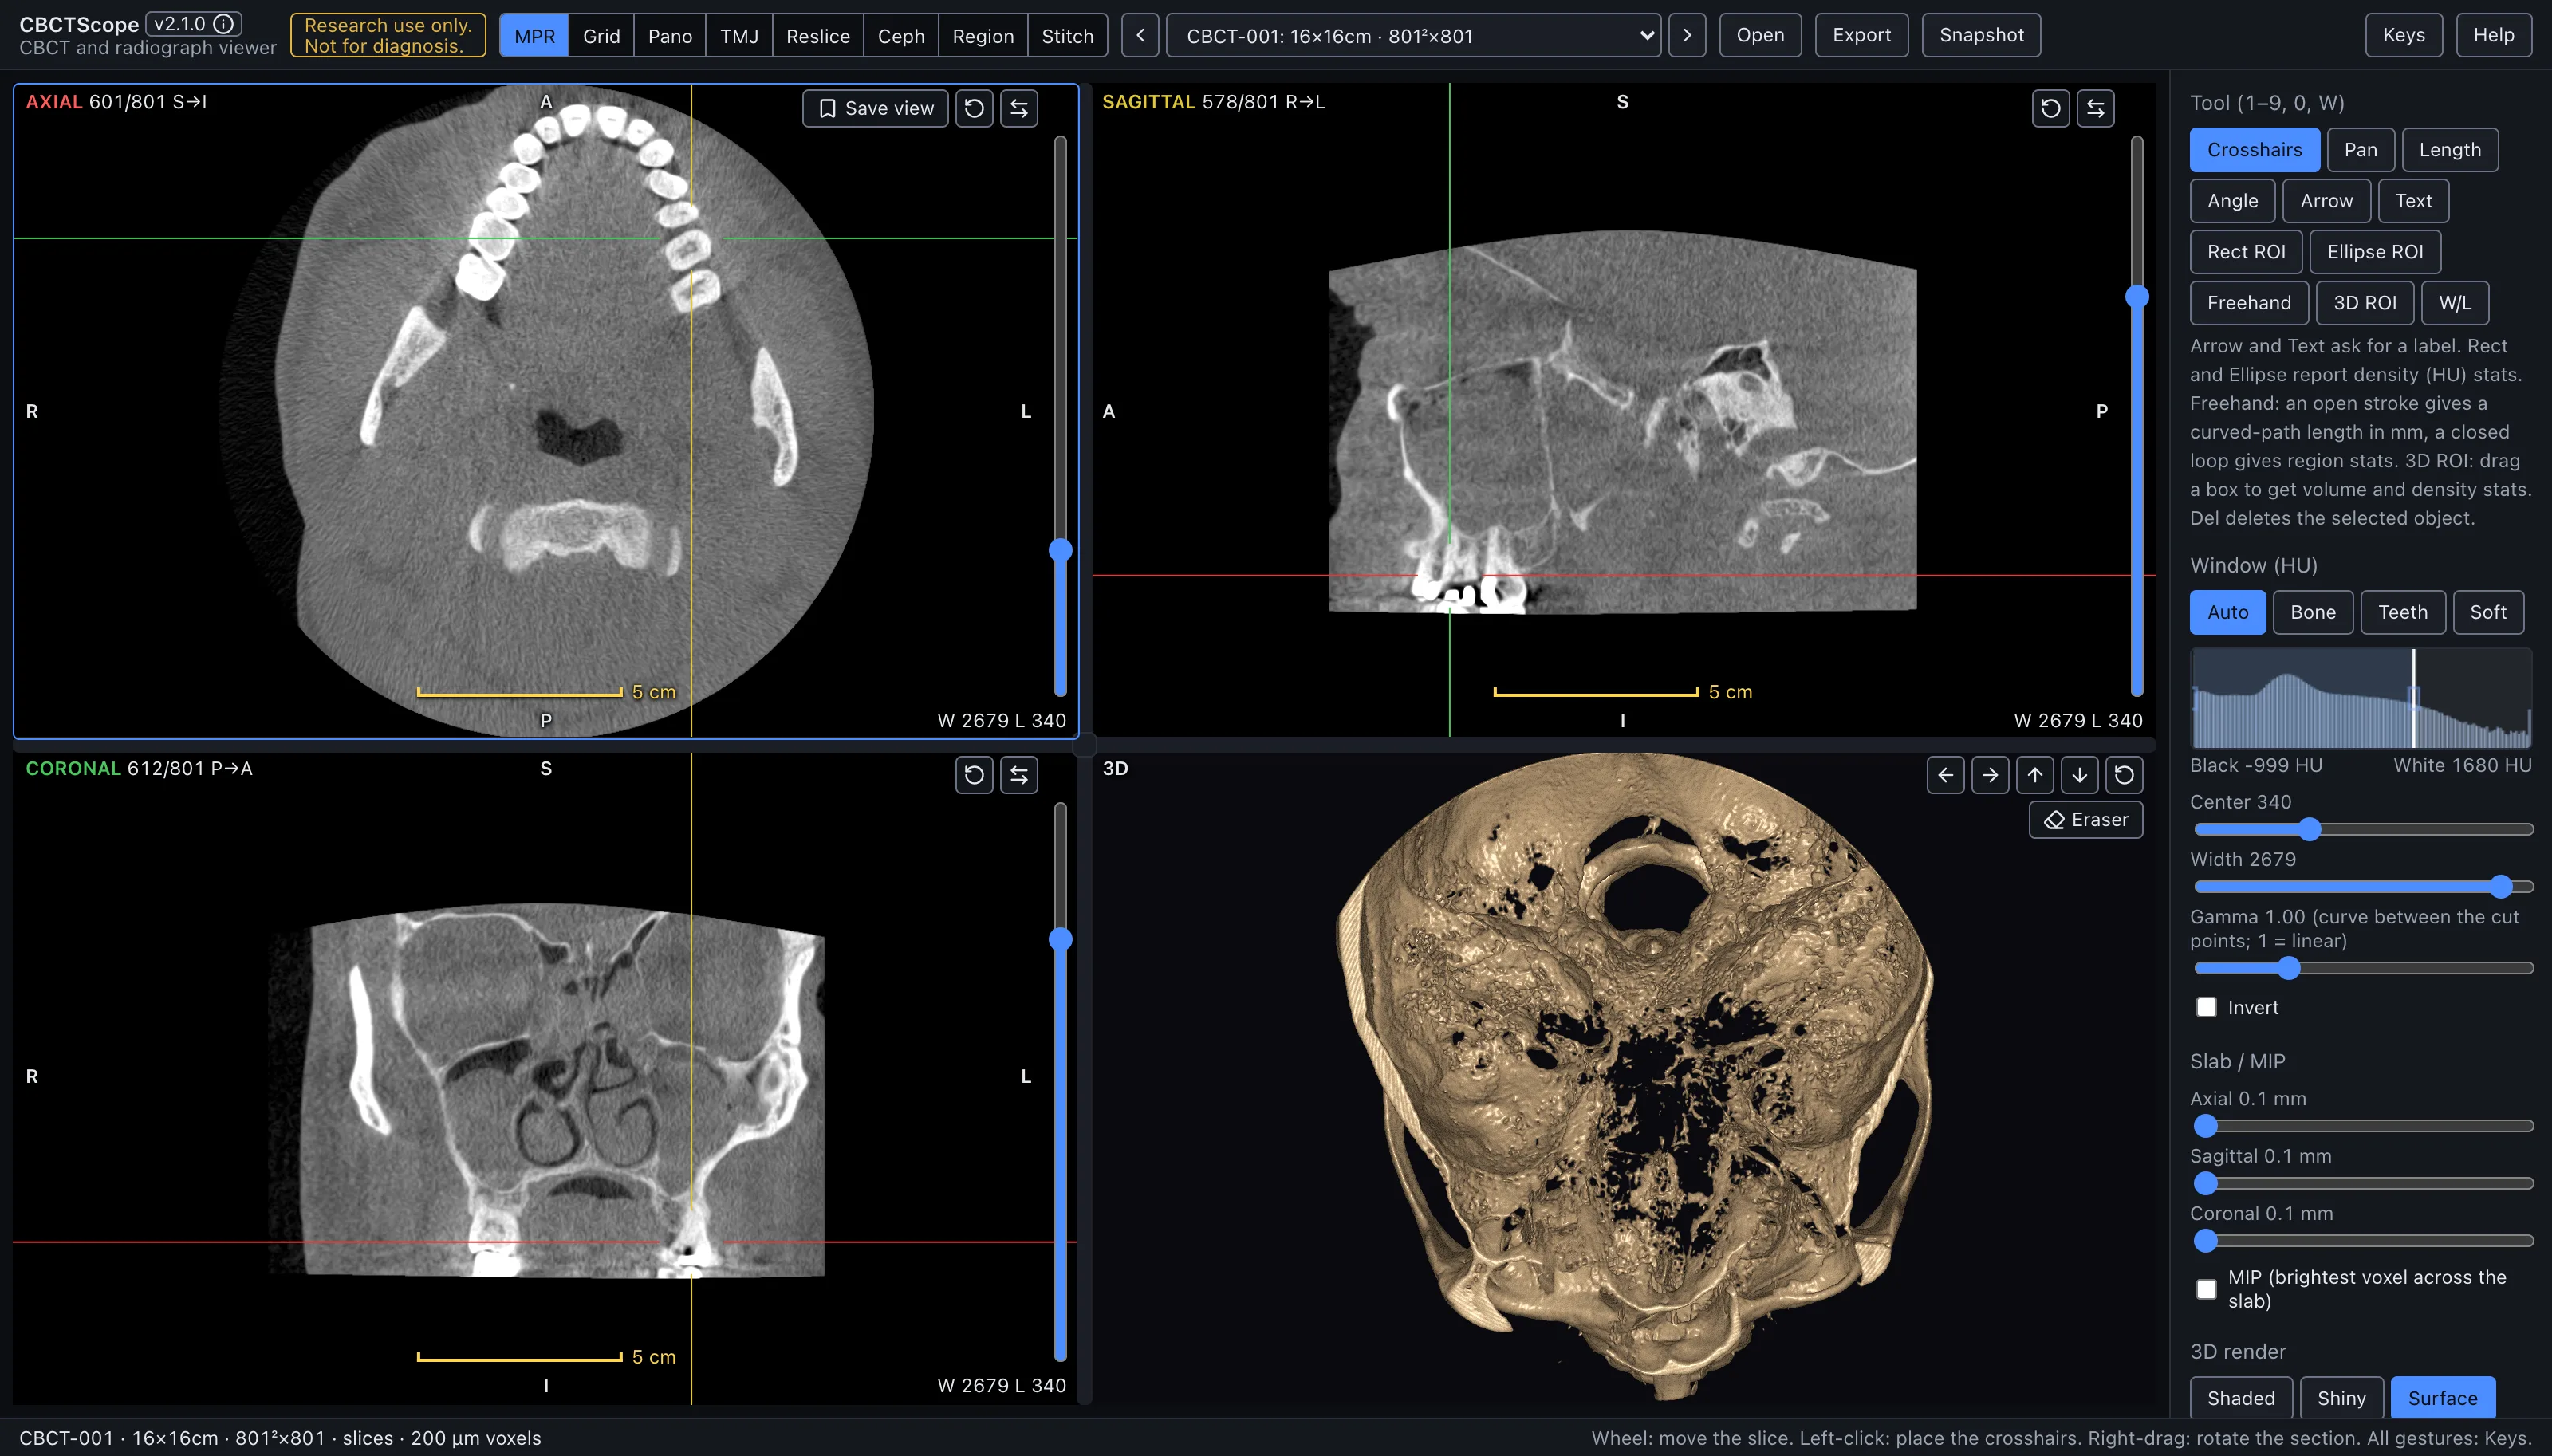
MPR is the default view: three orthogonal slice panes (axial, sagittal, coronal) with linked crosshairs, plus a 3D render in the fourth pane. It answers the general question "what is here, in three dimensions": localizing a structure, following it across planes, measuring it in true millimetres, and presenting it as a labeled figure. Everything else in the viewer is a specialization; when in doubt, start in MPR.
Gestures and keys
| Gesture or key | Where | Action |
|---|---|---|
| Wheel | slice pane | Scroll the hovered pane |
| Left click or drag | slice pane | The active tool; with Crosshairs, a click spots the crosshairs to that point and a drag pans |
| Shift + left click | slice pane | Select an annotation |
| Right-drag | slice pane | Rotate the section about the crosshair center; all three planes rotate rigidly and stay mutually orthogonal, with a live degree chip |
| Shift + right-drag, or right+left chord drag | slice pane | Zoom |
| Middle-drag | slice pane | Pan |
| Double-click | any pane | Maximize the pane; again to restore the 2 by 2 layout |
| Left-drag | 3D pane | Rotate the render |
| Middle-drag | 3D pane | Pan |
| Right-drag | 3D pane | Cut progressively into the render (the cutaway, below) |
| Right+left chord drag | 3D pane | Zoom |
1 to 9, 0 |
anywhere | Tools in palette order (Crosshairs to 3D ROI) |
W |
anywhere | The window/level tool |
R |
anywhere | Reset orientation |
C |
anywhere | Plane lines on or off |
O |
anywhere | Overlay master switch |
V |
anywhere | Save the current view |
Del |
anywhere | Delete the selected object |
N / P |
anywhere | Next or previous volume |
| Double-click a slider | sidebar | Reset it |
The controls
Panes. The screen is a 2 by 2 grid: AXIAL, SAGITTAL, CORONAL, 3D, with the
objects list in a strip under it once there is something to list. Each slice pane shows,
top left, its plane and slice counter with the direction the count runs (622/801 S→I:
slice 1 is the most superior; coronal counts P→A, sagittal R→L; the letters follow the
live camera, so an obliqued pane reports the direction it actually scrolls along);
bottom right, the window (W 4000 L 1000); patient-orientation letters at the edge
midpoints, computed from the live camera (they stay correct after oblique rotation); a
yellow scale bar at the bottom centre; a live HU readout under the cursor, bottom left (a
3 by 3 by 3 neighborhood mean); a slice slider on the right edge; and, top right, the
Reset view and Flip buttons (section 3.7), with Save view in the axial pane.
The pane that takes the wheel carries a thin blue frame. The 3D pane's top-right buttons
orbit the render left, right, up and down (hold to keep turning) and reset its camera.
The crosshair and the axial level are the reading place the other modes share (section
3.3): leave for Pano and come back, and they are where you left them.
Tool palette ("Tool (1-9, 0)"): Crosshairs, Pan, Length, Angle, Arrow, Text, Rect
ROI, Ellipse ROI, Freehand, 3D ROI, on hotkeys 1 through 9 and 0; W/L on W. Arrow and
Text prompt for a label. Rect and Ellipse ROIs report density (HU) stats. A Freehand open
stroke measures a curved path in mm; closing the loop turns it into a region with HU
stats. 3D ROI drags a rectangle on any slice pane and extends it through the slice by the
"box depth" slider (1 to 60 mm, default 10), returning volume and density stats with an
outline in the 3D pane. Del deletes the selected object.
Window (HU). Presets Auto, Bone, Teeth, Soft; a histogram whose black and white cut lines can be dragged directly (below black renders black, above white renders white); center and width sliders; a gamma slider (1 = linear, double-click resets); an invert checkbox.
Slab / MIP. Per-pane slab thickness (0.1 to 20 mm) and a MIP checkbox that takes the brightest voxel across the slab instead of the average.
3D render, style. A style picker with two parametric groups, Styles (Shaded, Shiny, Surface, Soft tissue, MIP, X-ray, X-ray shaded, B&W X-ray) and CBCT tuned (Bone and teeth, Teeth (high density), Translucent bone, solid teeth), plus Air, the rendering library's air preset, which applies as it is: the adjust sliders do not work on it. A saved view or saved 3D preset that names a generic CT preset from earlier versions opens on Shaded. Surface, a bone-toned isosurface, is the default. The shaded styles light off the render's opacity cloud with local ambient occlusion, so sockets and interproximal gaps self-shadow.
3D render, adjust (parametric styles): cut-off threshold (densities below stay transparent; also draggable on the render histogram; double-click returns to the style's default), transparency, contrast, brightness, pseudo-color (none, hot, cool, rainbow), depth enhancement (flat interiors fade, surfaces pop), smooth 3D surface (the 3D pane renders from a lightly denoised copy of the volume; slice views always keep the original voxels; on by default), cinematic light (in-volume light scattering for soft shadows, slower to orbit), a light-follows-camera toggle with fixed light azimuth and height sliders when off, and an optional soft-tissue overlay (a skin-toned translucent band with its own threshold and opacity). While the camera moves, the render temporarily coarsens its sampling and sharpens again on idle. Perspective projection is a separate toggle (off = orthographic; toggling re-homes the 3D camera). Plane indicators draw the three section planes and a bounding box inside the render.
Crop 3D. Per-axis keep ranges (R to L, A to P, I to S) that crop the render only; the slices are unaffected. "Un-crop and clear cuts" restores the full volume.
Cutaway. Right-drag on the 3D pane opens a cut plane facing the camera; dragging up pushes it deeper, down backs it out. Later right-drags resume the same cut from its current depth; backing out past zero removes it (so does the Clear cuts button, bottom left of the 3D pane), and only then does a new drag open a fresh plane facing wherever the camera is now.
Render eraser. The Eraser button on the 3D pane turns left-drag into a brush (radius 1 to 12 mm) that erases what you touch on the render. It edits a 3D-only copy of the voxels; the slice panes never change. Undo, redo, and revert are on the same toolbar.
My 3D presets. Save the current render settings under a name; Default beside a saved preset marks it as the one applied on app start (solid blue while it is), and Delete removes it.
Snapshot and views. Snapshot (header) saves the visible layout (annotations
included) as a PNG, with each slice pane's window and scale bar. Save view (V), in
the axial pane's top-right buttons, stores all four cameras plus window and render
settings under a name; the objects list under the panes restores it in one click. Annotations, saved
views, and 3D ROIs persist per volume in the evidence sidecar and return when the volume
is reopened.
A reading workflow
- Open the scan and confirm the volume label in the header's volume list, and the field of view and voxel size in the status line at the bottom.
- Press R to start from orthogonal planes, then set the window: Bone or Teeth for the skeletal read, Soft for the soft tissues, Auto to return to the volume's own window.
- Scroll each pane through its full extent once before concentrating on any one finding, so the whole imaged volume is reviewed.
- Use the crosshairs to localize: click a structure in one pane and read it in the other two at the same point.
- When a structure does not lie in an orthogonal plane, right-drag to rotate the section about it; press R when done to return to the standard planes.
- Window for bone before assessing cortical outlines, and widen the slab with MIP when a thin high-density structure needs to stand out from noise.
- Keep the slab thin (near 0.1 mm) when judging fine structures; a thick slab averages small detail away.
- Measure with Length, Angle, or an ROI; measurements here are true anatomical mm with no projection magnification.
- Save a named view at each finding's exact presentation, then take a snapshot for the record.
Over MCP
Every verb applies here. navigate_slice moves the three panes, set_3d_style picks
the 3D pane's style, and the saved-view verbs (list_views, goto_view, save_view)
work on this mode's views; a view the agent saves carries the agent badge.
viewer_state reports each pane's slice in the pane count with its direction. A typical
sequence: open_scan with a local export path (or pick_scan to let the reader choose),
list_volumes to read the geometry, select_volume, set_view_mode to mpr,
set_window_level with the Bone preset, navigate_slice with pane: "axial" and an
index or delta, then snapshot. reset_view returns the cameras to orthogonal; with
full: true it also resets window, inversion, and gamma. The mpr-survey and
replay-views prompts are this workflow, scripted.
Limits
MPR displays and measures; it does not interpret. Slice-level ROI statistics are raw HU numbers, and CBCT HU calibration is approximate by nature, so treat absolute values as starting points rather than calibrated densitometry. The render eraser and the cutaway alter the 3D presentation only and never modify the slice data. CBCTScope is navigation and visualization only: no findings, no diagnoses. Research use only; not a medical device.