Pano
At a glance
- What the view shows: survey the dentition and jaws in one panoramic layout, then see any point in cross-section, including the mandibular canal traced in three dimensions.
- Start: scroll the axial editor to a slice through the tooth-bearing arch, draw the arch in one stroke through the roots and alveolar process (or click Auto arch and adjust the dots), double-click to finish; the pano and its cross-sections render live.
- Three gestures: on the axial editor, a stroke draws the arch and the wheel scrolls; on the pano, a click or the wheel moves the cross-sections along the arch; right-drag on a cross-section tilts the whole frame. The Keys card lists every gesture of the mode.
- Leave it for: measurements in true anatomical mm (MPR), and anything outside the sampled slab, which the pano simply does not contain.
What this mode is for
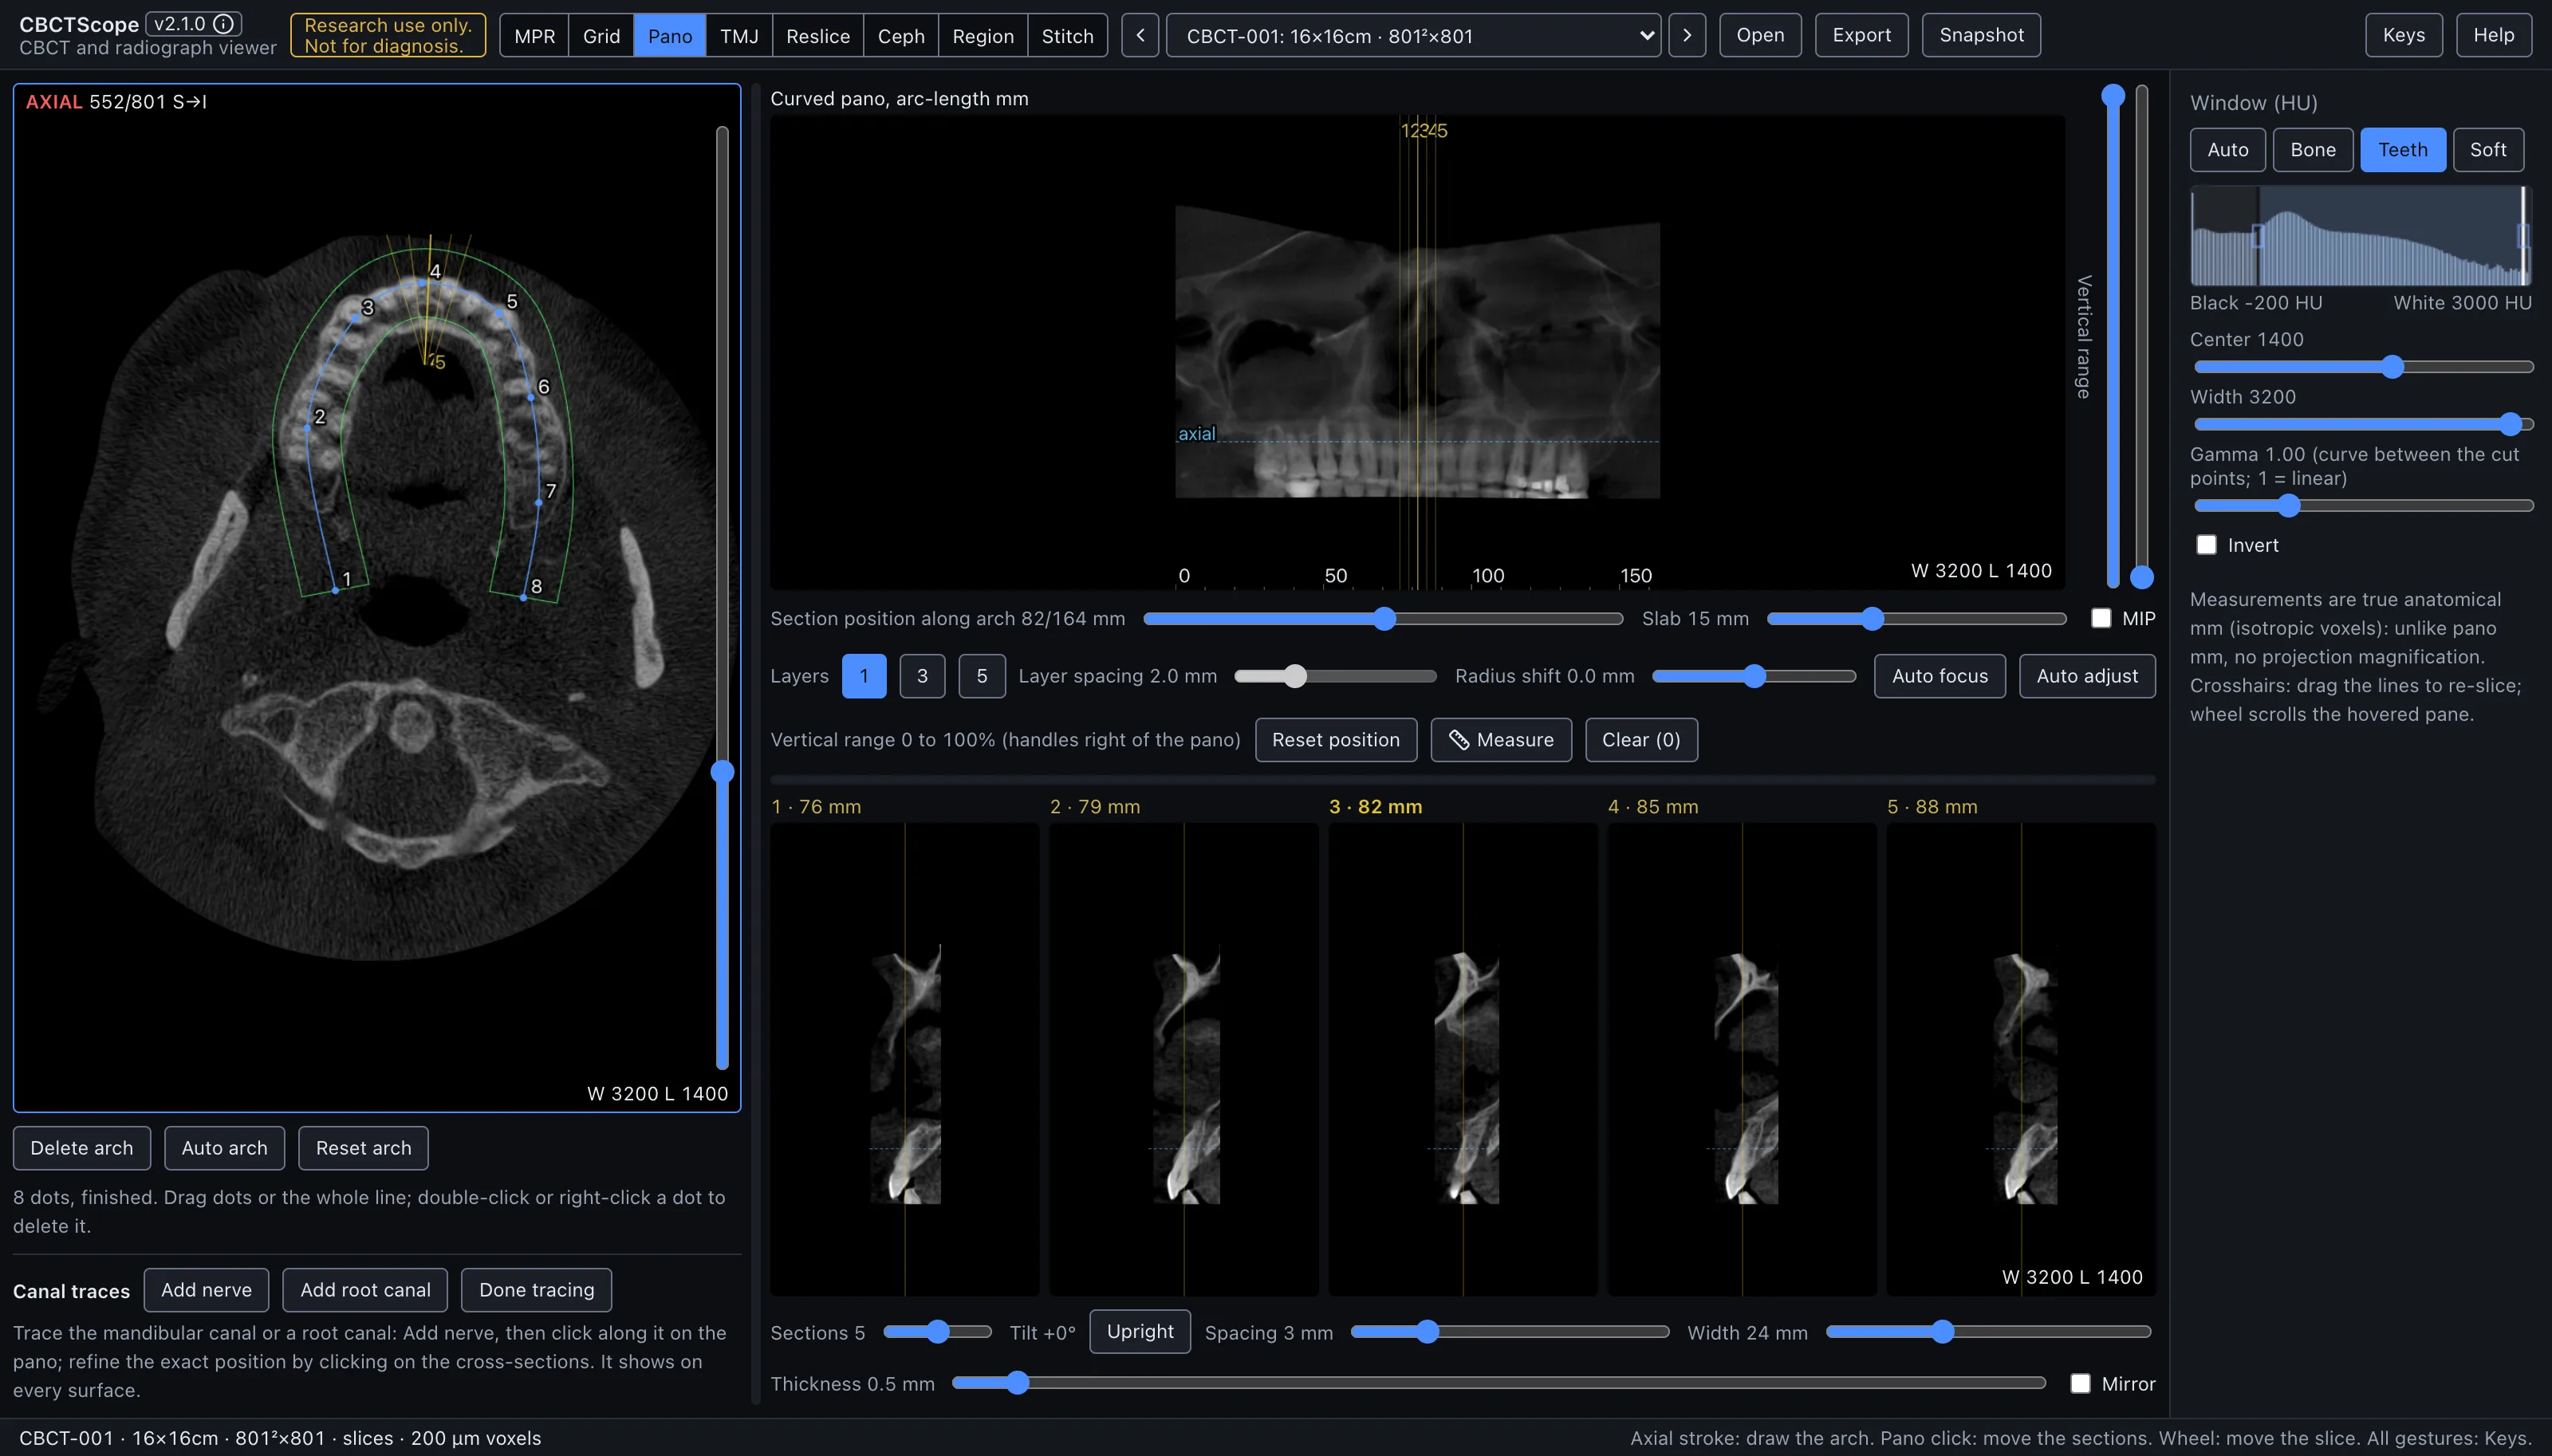
Pano reconstructs a curved panoramic view along the dental arch, with perpendicular cross-sections at any position on the curve. You draw the arch once on an axial slice; the panoramic and its cross-sections then reconstruct live. It answers the arch-wide questions: surveying the dentition and jaws in one familiar panoramic layout, then dropping into a cross-section to see any point in its buccolingual dimension, including the course of the mandibular canal traced in three dimensions.
Gestures
| Gesture | Where | Action |
|---|---|---|
| Freehand stroke, or clicks | axial editor, while PLACING | Draw the arch in one stroke, or click control points along it |
| Double-click | axial editor, while PLACING | Finish the arch (a stray double-click dot is popped, not kept) |
| Drag a dot | axial editor, once FINISHED | Refine the arch |
| Drag the line itself | axial editor, once FINISHED | Move the whole arch |
| Double-click or right-click a dot | axial editor, once FINISHED | Delete that dot |
| Wheel | axial editor | Scroll the slice; the pane label counts like the MPR axial pane (AXIAL 622/801 S→I, slice 1 at the top of the head), so a slice number carries between modes unchanged |
| Click or wheel | pano | Move the cross-section position along the arch |
| Right-drag | any cross-section | Rotate the section fan (tilt), with a live degree chip |
| Click | pano, while tracing | Add a point to the trace |
| Click | cross-section, while tracing | Set that point's exact buccolingual position and height at that arc position |
| Right-click a point | pano | Delete that trace point |
| Drag | pano or cross-section, with measure on | Measure in mm on that reformat surface; right-click a line deletes it |
| Drag a divider | between editor, pano, and sections | Resize; double-click resets |
| Double-click a handle or slider | pano edge, controls | Reset it |
The controls
The arch editor (left) shows an axial slice with its own slice slider. The arch has two phases, PLACING and FINISHED, and the status chip under the editor always names the phase; once FINISHED, clicks on the slice are inert. Auto arch proposes the arch from the anatomy of the current slice, to be adjusted by dragging the dots. Delete arch removes the whole line (clearing the pano and cross-sections) and returns to placing; Reset arch puts the arch back to its position as of the last finish, undoing dot and whole-arch drags. The arch persists per volume across sessions.
The editor also draws the slab envelope: two green curves flanking the band of anatomy the pano actually samples, centered on the rendered layer (radius shift and the adaptive bend included) and closed at the arch ends. What sits between the curves is in the pano; what sits outside is not.
Panes. The axial editor shows AXIAL n/N top left and the window bottom right. The
pano's caption sits in a strip above it; its window readout, bottom right, follows
Auto adjust. The cross-sections carry the window bottom right of the last one.
Measurement labels stay inside the image on a dark halo. The pane that takes the wheel carries a thin blue frame, and the axial level is the reading place shared with the other modes (section 3.3).
The pano canvas carries a ruler marking arc-length in mm. Its controls, in the rows under it (a selected chip or toggle is solid blue):
| Control | Range or options | What it does |
|---|---|---|
| Section position along arch | mm | The same movement as a click on the pano, as a slider |
| Slab | 2 to 40 mm | The depth sampled around the arch layer; MIP switches the slab from average to brightest-voxel |
| Layers | 1, 3, or 5 | A stack of parallel pano layers to flip through the focal trough |
| Layer spacing | 0.5 to 6 mm | The distance between those layers |
| Radius shift | -8 to +8 mm | Slides the whole sampling layer buccal or lingual without redrawing the arch; double-click resets |
| Auto focus | toggle | The layer bends buccal or lingual to follow the sharpest anatomy; click again to return to the flat drawn layer |
| Auto adjust | toggle | A one-click contrast window computed from the pano's own pixels plus light sharpening; click again to undo. It overrides the shared window for the pano until toggled off |
| Vertical range | two handles on the pano's right edge | Drag the top handle down or the bottom handle up to cut skull base or hyoid level out of the pano and sections; the kept band scales into the fixed pane, and double-click on a handle resets it. This is a real cut of the sampled range, not a mask |
| Reset position | button | Returns the reading position, as described under Section rotation below |
| Measure, Clear (n) | toggle, button | Measuring on the pano and the cross-sections, and removing every measurement (n counts them) |
Cross-sections:
| Control | Range or options | What it does |
|---|---|---|
| Sections | 1 to 9 | How many cross-sections |
| Tilt, Upright | readout, button | The fan's tilt in degrees, and the button that sets it back to 0° |
| Spacing | 1 to 10 mm | The distance between sections |
| Width | 10 to 50 mm | The width of each section |
| Thickness | 0 to 10 mm | Averaged along the arch |
| Mirror | toggle | Flips which side of the arch faces left in every section |
Each section is numbered to match its line on the axial editor and on the pano; its caption, in a strip above the image, gives its arc position in mm, the centre section's in bold yellow.
Section rotation. Right-drag on any cross-section rotates the section fan, the same sweep gesture as the MPR and grid rotations, with a live degree chip. The tilt drives the whole frame rigidly: the pano re-cuts with the same leaning vertical, the axial editor goes oblique to match, and the arch and canal traces stay visible on it as dashed true projections. Reset position returns the reading position (sections to mid-arch, tilt upright, full vertical crop, radius shift zero) while leaving the arch, slab settings, and pane layout untouched. The pane dividers between editor, pano, and sections drag to resize and double-click to reset.
Canal traces. Add nerve or Add root canal starts a trace. Click along the canal on the pano to add points; click on a cross-section to set the exact buccolingual position and height at that arc position; right-click a point on the pano deletes it. Done tracing stops adding points. Each trace is a 3D polyline in volume space, projected live onto the pano as a colored line, onto every cross-section as a crossing dot, and onto the axial editor as dots. Each trace has its row: the trace button (solid blue while it is the one being traced; click it to resume or stop), Shown or Hidden, and Delete. Traces persist in the evidence sidecar.
Measure. The Measure button turns dragging on the pano or a cross-section into a mm measurement on that reformat surface; right-click a line deletes it, and Clear (n) removes all of them. Measurements persist with the traces.
Window. The shared Window (HU) presets, center, width, and invert apply (Auto adjust overrides them for the pano until toggled off).
A reading workflow
- Scroll the axial editor to a slice through the tooth-bearing arch and draw the arch in one stroke through the middle of it, or start from Auto arch and adjust the dots.
- Draw the arch through the roots and alveolar process rather than the crowns, so the pano layer carries the structures the read is about.
- Set slab thickness to cover the buccolingual spread of the arch; widen it, or add layers, when structures fall outside the focal trough and blur out.
- Trim the vertical range to the jaws so the pano rows are anatomy, not skull base.
- Survey the pano end to end at a bone or teeth window, using the arc ruler to keep track of position.
- At each point of interest, click the pano to center the cross-sections there and read the buccolingual dimension the pano itself cannot show.
- To follow the mandibular canal, start a nerve trace, click along the canal on the pano, then correct each point's buccolingual position on the cross-sections.
- Measure on the surface where the distance actually lies: pano for mesiodistal spans along the arch, cross-sections for heights and buccolingual widths.
- Take an MCP or MPR snapshot for the record once the layout shows what it should.
Over MCP
open_scan, list_volumes, select_volume, set_view_mode (mode pano),
set_window_level, and snapshot apply; the snapshot captures the axial editor, the
pano, and the cross-sections as laid out. navigate_slice with pane: "axial" moves the
axial editor slice; navigate_arch centers the cross-sections at a position along the
arch in mm from the patient-right end (position_mm or delta_mm). viewer_state
reports the axial slice, the arch position, and the arch length, or no arch when none is
drawn. Arch drawing and tracing stay hand work with no agent verb: an agent that finds no
arch asks the reader to draw it. Example sequence: set_view_mode to pano,
set_window_level preset Teeth, navigate_arch with position_mm: 0, then delta_mm
steps with a snapshot at each; the pano-survey prompt is this sequence, scripted.
Limits
The pano is a reformat, not a projection radiograph: what it shows depends on the drawn arch and layer settings, and structures outside the sampled slab are simply absent. Measurements on the pano and sections are computed in mm on the reformat surface, which is only as anatomically faithful as the arch it was built on. Traces are reader-drawn navigation aids, not detected anatomy. CBCTScope is navigation and visualization only: no findings, no diagnoses. Research use only; not a medical device.