TMJ
At a glance
- What the view shows: what does each condyle look like in sections corrected to its own axis, and how do the two sides compare?
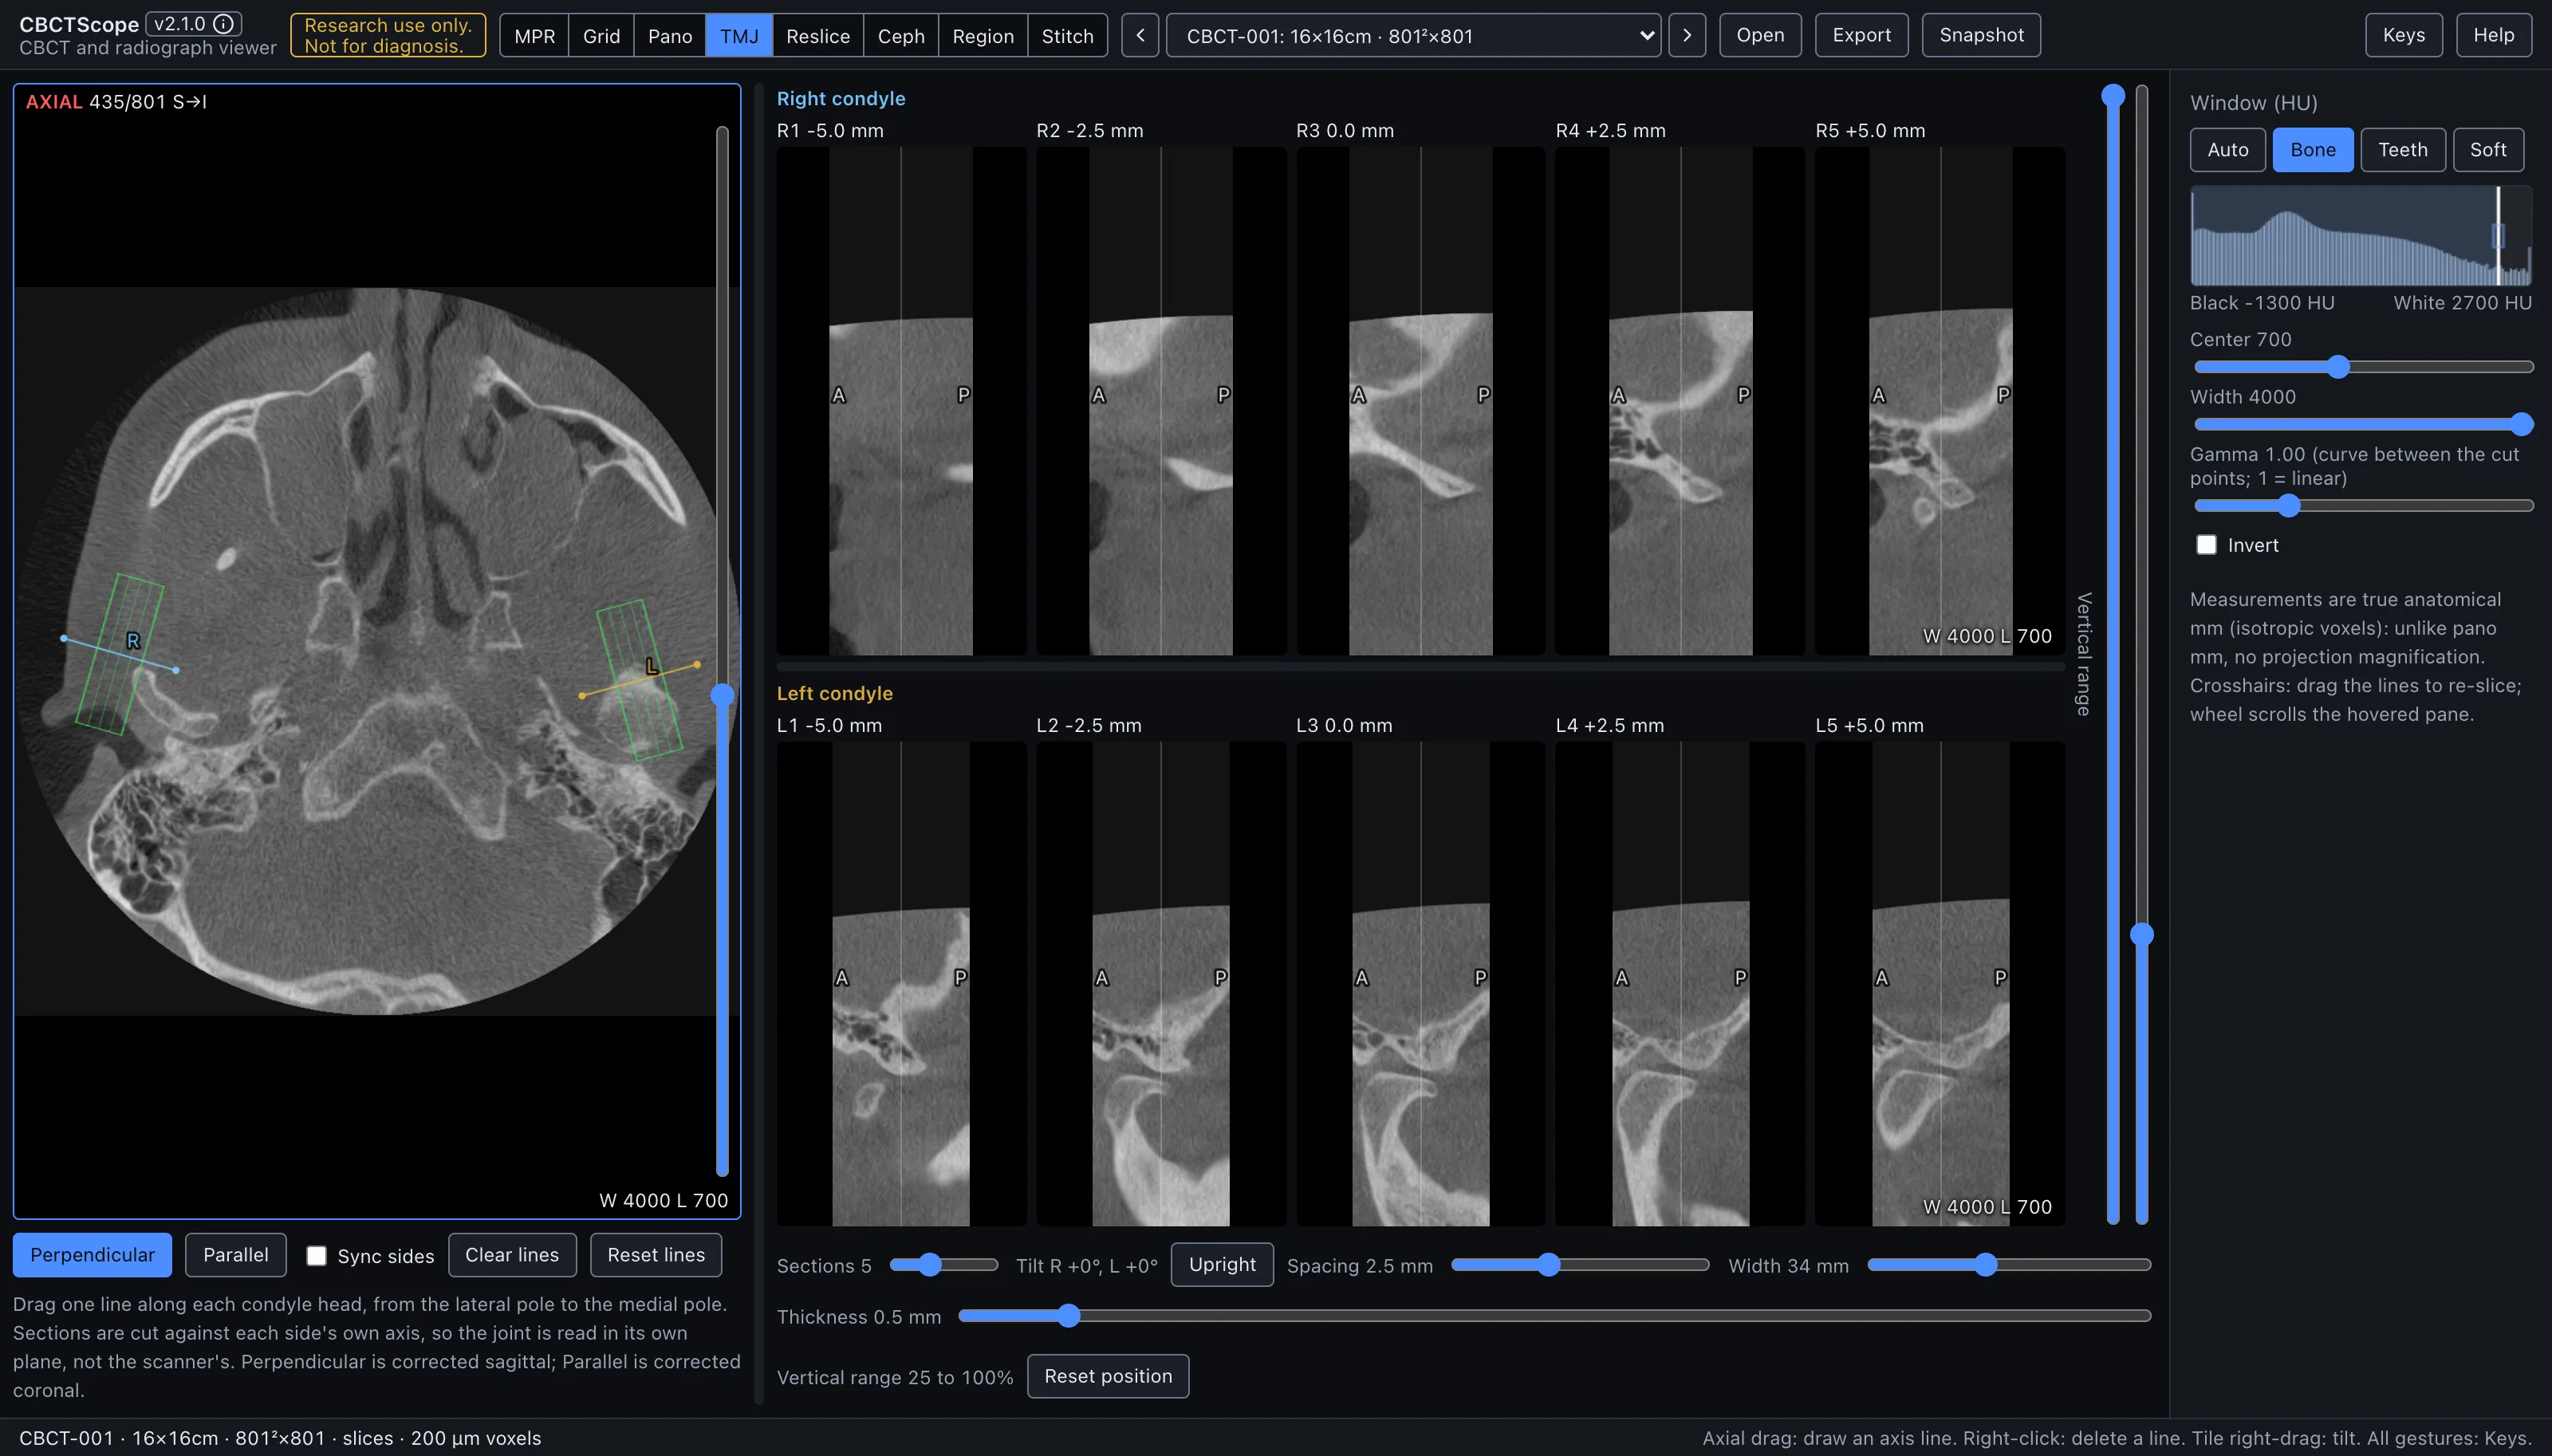
- Start: scroll the scout to the level where both condylar heads are widest, drag one line per condyle along its long axis (lateral pole to medial pole), set a bone window; the sections appear as soon as a line exists.
- Three gestures: on the scout, drag draws or moves an axis line and right-click deletes it; the wheel scrolls the scout slice; right-drag on a section tilts that side's fan. The Keys card lists every gesture of the mode.
- Leave it for: measurements, which live in MPR at the same location.
What this mode is for
TMJ reads both temporomandibular joints side by side, each in sections corrected to its own condylar axis. The two condylar heads rarely align with the scanner's sagittal and coronal planes, and they rarely align with each other; this mode cuts each side against its own long axis, so the joint is read in its plane, not the scanner's. It answers the paired question: "what does each condyle look like in properly oriented sections, and how do the two sides compare?"
Gestures
| Gesture | Where | Action |
|---|---|---|
| Drag on the image | scout | Draw one axis line per condyle, lateral pole to medial pole; the side is assigned automatically from the patient midline |
| Drag an endpoint | scout | Adjust the axis |
| Drag the line body | scout | Move the line |
| Right-click a line | scout | Delete it |
| Wheel | scout | Scroll the slice; the caption uses the MPR axial count (S→I, slice 1 at the top) |
| Right-drag | any section | Rotate that side's fan, independently per side |
| Drag a divider | between scout and sections, between the rows | Resize; double-click resets |
| Double-click a crop handle | sections column | Reset that handle |
The lines and the scout slice persist per volume.
The controls
| Control | Options or range | What it does |
|---|---|---|
| Panes | scout, two rows | The scout shows AXIAL n/N top left and the window bottom right. Each row's side name and each section's caption sit in strips above the images; the window is bottom right of each row's last section. The pane that takes the wheel carries a thin blue frame, and the axial level is the reading place shared with the other modes (section 3.3). |
| Section orientation | Perpendicular | Sections perpendicular to each condyle's axis, the corrected sagittal stack, labeled A (anterior) and P (posterior) at the edge midpoints. |
| Parallel | Sections parallel to the axis, the corrected coronal stack, labeled lat and med. The selected orientation is solid blue. | |
| Sync sides | checkbox | Editing one side (dragging an endpoint or the whole line) mirrors it to the other side about the midline, for a symmetric starting point that can then be refined per side. A fresh draw fills the other side only when it is empty; it never replaces a placed line there, so a stray stroke cannot wipe a tuned opposite side. |
| Clear lines | button | Deletes both axis lines. |
| Reset lines | button | Restores both axis lines to where they were drawn, rolling back exploratory nudges. |
| Vertical range | two handles on the right edge of the sections column | Trim the sections top and bottom to the condyle and fossa region (the default keeps roughly the upper three quarters of the volume); double-click on a handle resets it. |
| Sections | 3 to 9 per side | Shared section controls: how many sections each side gets. |
| Tilt R, L and Upright | readout, button | Each side's fan tilt in degrees, and the button that sets both back to 0°. |
| Spacing | 0.5 to 6 mm | Distance between sections. |
| Width | 16 to 60 mm | Width of each section. |
| Thickness | 0 to 6 mm | Averaged across each section. |
| Scout band and labels | scout, sections | The scout outlines each side's sampled band in green with cut marks showing where that side's sections cut. Each section's caption, in a strip above it, gives its side, number, and offset in mm from the axis midpoint. |
| Fan rotation | right-drag on any section | Rotates that side's fan, the same sweep gesture as the other modes, independently per side. The scout itself stays upright by design (one scout serves two independent sides): a tilted side's band redraws dashed as its exact axial shadow, its cut marks and orientation letters hide, and the axis line stays editable throughout. |
| Reset position | button | Returns both fans upright and the vertical crop to the condyle default, leaving lines, section parameters, and pane splits untouched. |
| Layout | right side of the screen | The RIGHT condyle row above the LEFT condyle row, each side cut against its own axis with the same section settings; the divider between scout and sections and the row divider drag to resize and double-click to reset. |
| Window | shared sidebar | The shared Window (HU) presets, center, width, and invert apply. |
A reading workflow
- Scroll the scout to the level where both condylar heads show their widest outline.
- Drag one line per side along the condylar head, lateral pole to medial pole; start with Sync sides if the sides are roughly symmetric, then uncheck it and refine each side on its own axis.
- Set a bone window before assessing the joints; the osseous read is what these thin sections are for.
- Start in the Perpendicular (corrected sagittal) orientation with thin sections at close spacing, so the whole head is covered from lateral to medial pole.
- Read each side lateral to medial in order, then switch to the Parallel (corrected coronal) orientation for the mediolateral read.
- Follow the cortical outline of each condyle across consecutive sections, and use the fossa and joint space in the same sections for the positional read.
- Compare left and right at matching offsets; the rows are aligned to make side-to-side comparison direct, and asymmetry of the axes themselves is worth noting.
- Keep thickness near zero for cortical detail; add 1 to 2 mm of thickness when noise, rather than resolution, limits the read.
- Record the presentation with a snapshot once both rows show the joints correctly.
Over MCP
open_scan, list_volumes, select_volume, set_view_mode (mode tmj),
set_window_level, and snapshot apply; the snapshot captures the scout and both
condyle rows. navigate_slice has nothing to move here (it works in MPR, grid, and pano) and answers with a clear error; axis lines are drawn by hand and have no
agent verb. Example sequence: set_view_mode to tmj, set_window_level preset
Bone, snapshot.
Limits
Sections exist only after an axis line is drawn, and their obliquity is exactly as good as the drawn axis. There are no measurement tools in this mode; measure in MPR at the same location. This is a static osseous and positional presentation of a joint imaged in one mandibular position; it says nothing about function or movement. CBCTScope is navigation and visualization only: no findings, no diagnoses. Research use only; not a medical device.